一篇帶你創建 Tekton 流水線
前面我們創建的兩個任務 test 和 build-and-push 都已經完成了,我們還可以創建一個流水線來將這兩個任務組織起來,形成一個流水線,這里就是我們要使用的 Pipeline 這個 CRD 對象。
創建流水線
比如我們這里的流水線流程為先運行 test 任務,如果通過了再執行后面的 build-and-push 這個任務,那么我們可以創建一個名為 test-pipeline.yaml 的資源對象,內容如下所示:
- # test-pipeline.yaml
- apiVersion: tekton.dev/v1beta1
- kind: Pipeline
- metadata:
- name: test-pipeline
- spec:
- resources: # 為 Tasks 提供輸入和輸出資源聲明
- - name: demo-git
- type: git
- - name: harbor-image
- type: image
- tasks: # 添加task到流水線中
- # 運行應用測試
- - name: test
- taskRef:
- name: test
- resources:
- inputs:
- - name: repo # Task 輸入名稱
- resource: demo-git # Pipeline 資源名稱
- # 構建并推送 Docker 鏡像
- - name: build-and-push
- taskRef:
- name: build-and-push
- runAfter:
- - test # 測試任務執行之后
- resources:
- inputs:
- - name: repo # 指定輸入的git倉庫資源
- resource: demo-git
- outputs: # 指定輸出的鏡像資源
- - name: builtImage
- resource: harbor-image
首先我們需要定義流水線需要哪些資源,可以是輸入或者輸出的資源,在這里我們只有一個輸入,那就是命名為 repo 的應用程序源碼的 GitHub 倉庫。接下來定義任務,每個任務都通過 taskRef 進行引用,并傳遞任務需要的輸入參數。
同樣直接創建這個資源對象即可:
- $ kubectl apply -f test-pipeline.yaml
- pipeline.tekton.dev/test-pipeline created
前面我們提到過和通過創建 TaskRun 去觸發 Task 任務類似,我們可以通過創建一個 PipelineRun 對象來運行流水線。這里我們創建一個名為 test-pipelinerun.yaml 的 PipelineRun 對象來運行流水線,文件內容如下所示:
- apiVersion: tekton.dev/v1beta1
- kind: PipelineRun
- metadata:
- name: test-pipelinerun
- spec:
- serviceAccountName: build-sa
- pipelineRef:
- name: test-pipeline
- resources:
- - name: demo-git # 指定輸入的git倉庫資源
- resourceRef:
- name: demo-git
- - name: harbor-image # 指定輸出的鏡像資源
- resourceRef:
- name: harbor-image
定義方式和 TaskRun 幾乎一樣,通過 serviceAccountName 屬性指定 ServiceAccount 對象,pipelineRef 關聯流水線對象。同樣直接創建這個資源,創建后就會觸發我們的流水線任務了:
- $ kubectl apply -f test-pipelinerun.yaml
- pipelinerun.tekton.dev/test-pipelinerun created
- $ github kubectl get pods | grep test-pipelinerun
- test-pipelinerun-build-and-push-62g65-pod-6jqqf 0/4 Init:1/2 0 3s
- test-pipelinerun-test-c4r9m-pod-j7jjd 0/2 Completed 0 12s
- $ tkn pipelinerun describe test-pipelinerun
- Name: test-pipelinerun
- Namespace: default
- Pipeline Ref: test-pipeline
- Service Account: build-sa
- Timeout: 1h0m0s
- Labels:
- tekton.dev/pipeline=test-pipeline
- 🌡️ Status
- STARTED DURATION STATUS
- 47 seconds ago 22 seconds Succeeded
- 📦 Resources
- NAME RESOURCE REF
- ∙ demo-git demo-git
- ∙ harbor-image harbor-image
- ⚓ Params
- No params
- 📝 Results
- No results
- 📂 Workspaces
- No workspaces
- 🗂 Taskruns
- NAME TASK NAME STARTED DURATION STATUS
- ∙ test-pipelinerun-build-and-push-62g65 build-and-push 38 seconds ago 13 seconds Succeeded
- ∙ test-pipelinerun-test-c4r9m test 46 seconds ago 8 seconds Succeeded
到這里證明我們的流水線執行成功了。我們將 Tekton 安裝在 Kubernetes 集群上,定義了一個 Task,并通過 YAML 清單和 Tekton CLI 創建 TaskRun 對其進行了測試。我們創建了由兩個任務組成的 Tektok 流水線,第一個任務是從 GitHub 克隆代碼并運行應用程序測試,第二個任務是構建一個 Docker 鏡像并將其推送到 Docker Hub 上。
使用 Results 傳遞數據
上面我們在構建鏡像的時候可以看到鏡像的 TAG 我們是寫死的,或者需要在每次執行的時候通過參數傳遞進去,比較麻煩,那么有沒有什么辦法可以自動生成鏡像 TAG 呢?比如根據時間戳來生成一個構建的ID。
這里我們可以通過定義一個 Task 任務,然后通過 script 腳本去獲取到數據后傳入到 results 中去,我們可以把這些 results 數據傳遞到流水線中的其他任務中去,比如我們想要獲取 git commit 的 SHA 值,或者生成一個隨機的 ID 來作為鏡像 TAG,比如這里我們創建一個名為 generate-build-id 的 Task 任務,定義了 get-timestamp 和 get-buildid 兩個 Steps,一個用于生成時間戳,一個用于生成一個包含基本版本的結果值,將結果添加到 results 中去。
- # generate-build-id.yaml
- apiVersion: tekton.dev/v1beta1
- kind: Task
- metadata:
- name: generate-build-id
- spec:
- description: >-
- Given a base version, this task generates a unique build id by appending
- the base-version to the current timestamp.
- params:
- - name: base-version
- description: Base product version
- type: string
- default: "1.0"
- results:
- - name: timestamp
- description: Current timestamp
- - name: build-id
- description: ID of the current build
- steps:
- - name: get-timestamp
- image: bash:5.0.18
- script: |
- #!/usr/bin/env bash
- ts=`date "+%Y%m%d-%H%M%S"`
- echo "Current Timestamp: ${ts}"
- echo ${ts} | tr -d "\n" | tee $(results.timestamp.path)
- - name: get-buildid
- image: bash:5.0.18
- script: |
- #!/usr/bin/env bash
- ts=`cat $(results.timestamp.path)`
- buildId=$(inputs.params.base-version)-${ts}
- echo ${buildId} | tr -d "\n" | tee $(results.build-id.path)
直接創建上面的 Task:
- kubectl apply -f generate-build-id.yaml
創建完成后,現在我們就可以在 Pipeline 中來使用這個 Task 了,用來生成構建 ID,修改 test-pipeline.yaml,增加 generate-build-id 任務:
- # test-pipeline.yaml
- apiVersion: tekton.dev/v1beta1
- kind: Pipeline
- metadata:
- name: test-pipeline
- spec:
- resources: # 為 Tasks 提供輸入和輸出資源聲明
- - name: demo-git
- type: git
- - name: harbor-image
- type: image
- params:
- - name: image-tag
- type: string
- tasks: # 添加task到流水線中
- # 運行應用測試
- - name: test
- taskRef:
- name: test
- resources:
- inputs:
- - name: repo # Task 輸入名稱
- resource: demo-git # Pipeline 資源名稱
- - name: get-build-id
- taskRef:
- name: generate-build-id
- params:
- - name: base-version
- value: $(params.image-tag)
- # 構建并推送 Docker 鏡像
- - name: build-and-push
- taskRef:
- name: build-and-push
- runAfter:
- - test # 測試任務執行之后
- resources:
- inputs:
- - name: repo # 指定輸入的git倉庫資源
- resource: demo-git
- outputs: # 指定輸出的鏡像資源
- - name: builtImage
- resource: harbor-image
- params:
- - name: imageTag
- value: "$(tasks.get-build-id.results.build-id)"
然后在 build-and-push 任務中通過 "$(tasks.get-build-id.results.build-id)" 獲取構建的 ID,將這個 ID 作為參數傳入任務中去,所以我們也需要在 build-and-push 任務中增加 build-id 這個參數:
- # task-build-push.yaml
- apiVersion: tekton.dev/v1beta1
- kind: Task
- metadata:
- name: build-and-push
- spec:
- resources:
- inputs: # 定義輸入資源
- - name: repo #輸入資源,就是github的那個倉庫
- type: git
- outputs: # 定義輸出資源
- - name: builtImage # 輸出鏡像名字
- type: image
- params:
- - name: pathToDockerfile #指明 dockerfile 在倉庫中的哪個位置
- type: string
- default: $(resources.inputs.repo.path)/Dockerfile # repo資源的路徑
- description: The path to the dockerfile to build
- - name: pathToContext #指明 dockerfile 在倉庫中的哪個位置
- type: string
- default: $(resources.inputs.repo.path) # repo資源的路徑
- description: the build context used by docker daemon
- - name: imageTag
- type: string
- default: "v0.2.0"
- description: the docker image tag
- steps:
- - name: build-and-push
- image: docker:stable
- script: |
- #!/usr/bin/env sh
- docker login harbor.k8s.local
- docker build -t $(resources.outputs.builtImage.url):$(params.imageTag) -f $(params.pathToDockerfile) $(params.pathToContext)
- docker push $(resources.outputs.builtImage.url):$(params.imageTag) # 這邊的參數都是在 input 和 output 中定義的
- volumeMounts:
- - name: dockersock #將docker.sock文件掛載進來,使用宿主機docker daemon 構建鏡像
- mountPath: /var/run/docker.sock
- volumes:
- - name: dockersock
- hostPath:
- path: /var/run/docker.sock
然后需要將 builtImage 這個 output 資源的 url 定義中將鏡像 tag 去掉,在 PipelineRun 對象中新增 image-tag 的參數:
- # test-pipelinerun.yaml
- apiVersion: tekton.dev/v1beta1
- kind: PipelineRun
- metadata:
- name: test-pipelinerun
- spec:
- serviceAccountName: build-sa
- pipelineRef:
- name: test-pipeline
- resources:
- - name: demo-git # 指定輸入的git倉庫資源
- resourceRef:
- name: demo-git
- - name: harbor-image # 指定輸出的鏡像資源
- resourceRef:
- name: harbor-image
- params:
- - name: image-tag
- value: "v0.3.0"
所有修改完成后,重新執行我們的整個流水線即可。
- $ tkn pipelinerun logs test-pipelinerun
- [test : git-source-repo-g68nd] {"level":"info","ts":1623934515.6170688,"caller":"git/git.go:169","msg":"Successfully cloned https://github.com.cnpmjs.org/cnych/tekton-demo @ 5e1e3a1d0f167b9b639df5b802a0f0f81064d21e (grafted, HEAD, origin/master) in path /workspace/repo"}
- [test : git-source-repo-g68nd] {"level":"info","ts":1623934515.6349964,"caller":"git/git.go:207","msg":"Successfully initialized and updated submodules in path /workspace/repo"}
- [test : run-test] PASS
- [test : run-test] ok _/workspace/repo 0.002s
- [get-build-id : get-timestamp] Current Timestamp: 20210617-125634
- [get-build-id : get-timestamp] 20210617-125634
- [get-build-id : get-buildid] v0.3.0-20210617-125634
- [build-and-push : git-source-repo-v2lhk] {"level":"info","ts":1623934601.68953,"caller":"git/git.go:169","msg":"Successfully cloned https://github.com.cnpmjs.org/cnych/tekton-demo @ 5e1e3a1d0f167b9b639df5b802a0f0f81064d21e (grafted, HEAD, origin/master) in path /workspace/repo"}
- [build-and-push : git-source-repo-v2lhk] {"level":"info","ts":1623934601.7080255,"caller":"git/git.go:207","msg":"Successfully initialized and updated submodules in path /workspace/repo"}
- [build-and-push : build-and-push] Authenticating with existing credentials...
- [build-and-push : build-and-push] Login Succeeded
- [build-and-push : build-and-push] WARNING! Your password will be stored unencrypted in /root/.docker/config.json.
- [build-and-push : build-and-push] Configure a credential helper to remove this warning. See
- [build-and-push : build-and-push] https://docs.docker.com/engine/reference/commandline/login/#credentials-store
- [build-and-push : build-and-push]
- [build-and-push : build-and-push] Sending build context to Docker daemon 154.1kB
- [build-and-push : build-and-push] Step 1/6 : FROM golang:1.14-alpine
- ......
- [build-and-push : build-and-push] Successfully built 2358e77bbe0e
- [build-and-push : build-and-push] Successfully tagged harbor.k8s.local/course/tekton-demo:v0.3.0-20210617-125634
- [build-and-push : build-and-push] The push refers to repository [harbor.k8s.local/course/tekton-demo]
- [build-and-push : build-and-push] f9a271a3fb3c: Preparing
- ......
- [build-and-push : build-and-push] 26ec43d351f2: Pushed
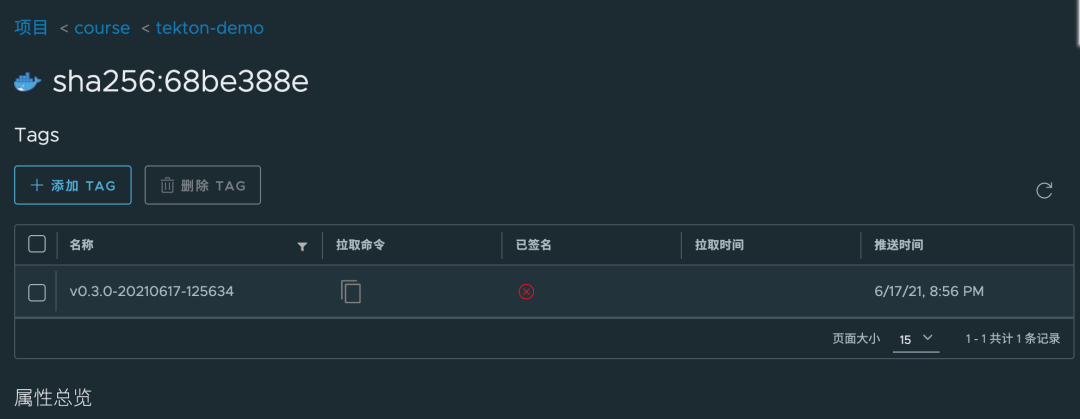
- [build-and-push : build-and-push] v0.3.0-20210617-125634: digest: sha256:68be388e3f85dd10a6689a986eb2f7f7f5a5c89bb03f40c3db3178e0ce242752 size: 2198
- [build-and-push : image-digest-exporter-t54fb] {"severity":"INFO","timestamp":"2021-06-17T12:56:46.54052284Z","caller":"logging/config.go:116","message":"Successfully created the logger."}
- [build-and-push : image-digest-exporter-t54fb] {"severity":"INFO","timestamp":"2021-06-17T12:56:46.541010181Z","caller":"logging/config.go:117","message":"Logging level set to: info"}
- [build-and-push : image-digest-exporter-t54fb] {"severity":"INFO","timestamp":"2021-06-17T12:56:46.541254959Z","caller":"imagedigestexporter/main.go:59","message":"No index.json found for: builtImage","commit":"7ca5d61"}
我們可以看到在 get-build-id 任務中為我們生成了 v0.3.0-20210617-125634 這樣的鏡像 TAG,最后也通過 results 傳遞到了下面的構建任務中去,鏡像的 TAG 也更新了。
Tekton Catalog
當然這些任務其實都具有一定的通用性的,為此 Tekton 官方提供了一個 Catalog 的服務,用來專門提供一些通用的任務,比如我們想要獲取 Git Commit 的相關信息,可以使用 https://artifacthub.io/packages/tekton-task/tekton-catalog-tasks/git-clone 這個 Catalog,文檔中也包含相關的使用說明。
到這里我們就完成了使用 Tekton 創建 CI/CD 流水線的一個簡單示例,不過這個示例還比較簡單,接下來我們再通過一個稍微復雜點的應用來完成我們前面的 Jenkins 流水線。