私有鏡像倉庫 Harbor 安裝和使用
介紹
我們?nèi)绻枰渴鹨粋€私有鏡像倉庫來使用,最簡單的就是 registry ,一行命令就可以運行在 Docker 中,但功能也比較弱,如果想要私有鏡像倉庫功能更豐富些,可以使用 Harbor 。
本文簡單介紹下 Harbor 的安裝和使用。
環(huán)境
- 服務(wù)器:CentOS 7 ,Harbor 部署在內(nèi)網(wǎng),通過 nginx 反向代理發(fā)布到外網(wǎng)使用
- Harbor:2.9.1
- docker:23.0.5
安裝
如果沒有安裝 wget ,先執(zhí)行下面命令安裝:
yum install -y wget下載包:
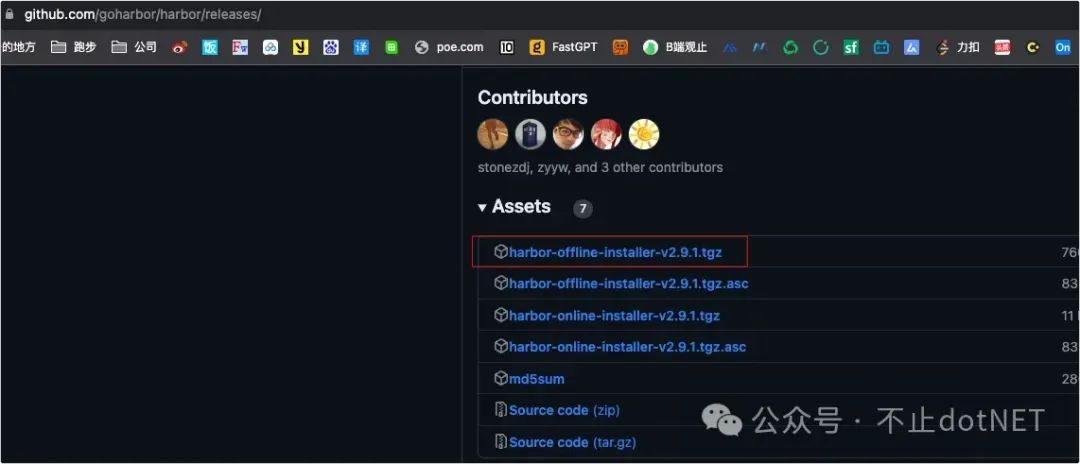
wget https://github.com/goharbor/harbor/releases/download/v2.9.1/harbor-offline-installer-v2.9.1.tgz如果無法通過 wget 進行下載,可以直接到 Github 網(wǎng)站:https://github.com/goharbor/harbor/releases/ 進行下載,然后拷貝到服務(wù)器中:
執(zhí)行下面命令進行解壓:
tar -xvf harbor-offline-installer-v2.9.1.tgz
執(zhí)行下面命令新建目錄,并將程序文件復制到目錄中:
mkdir /opt/harbor
mv harbor/* /opt/harbor
cd /opt/harbor
修改 Harbor 配置文件:
cp -ar harbor.yml.tmpl harbor.yml
vi harbor.yml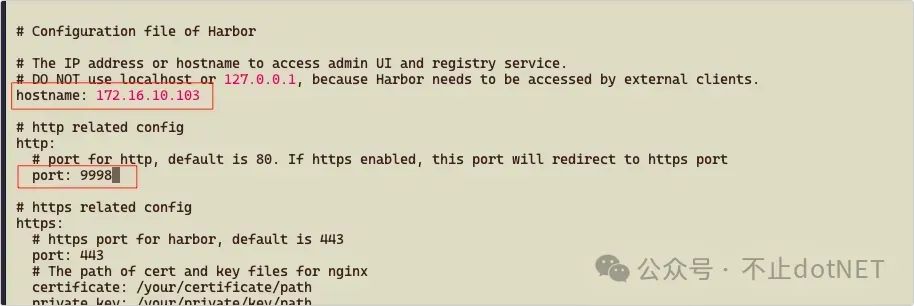
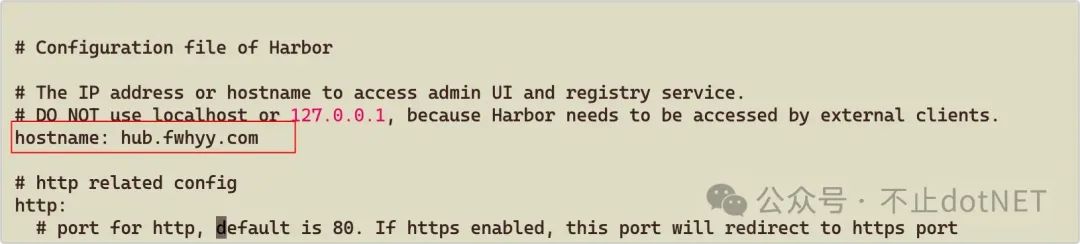
- hostname:如果只是內(nèi)網(wǎng)訪問,設(shè)置為內(nèi)網(wǎng) IP,如果需要外網(wǎng)訪問,就必須設(shè)置為外網(wǎng)域名或 IP
- port:Web 訪問的端口
編輯完配置文件,接下來在 harbor 目錄下安裝 Harbor。先進行預處理:
./prepare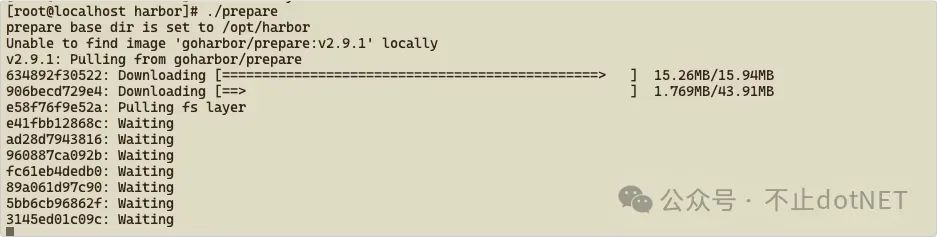
執(zhí)行下面命令進行安裝:
./install.sh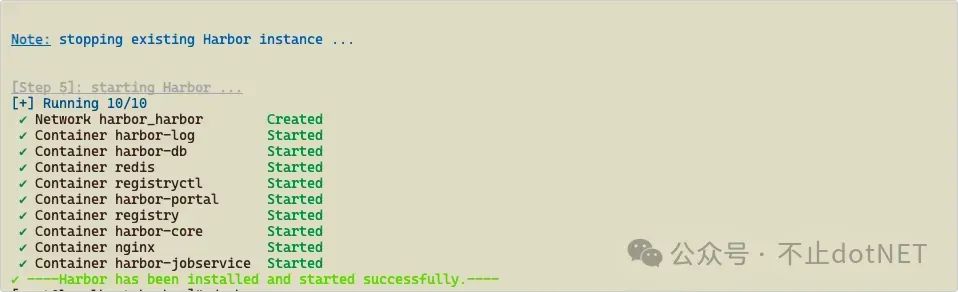
稍等一會,執(zhí)行 docker-compose ps ,如果所有容器的狀態(tài)都是 healthy ,說明正常:

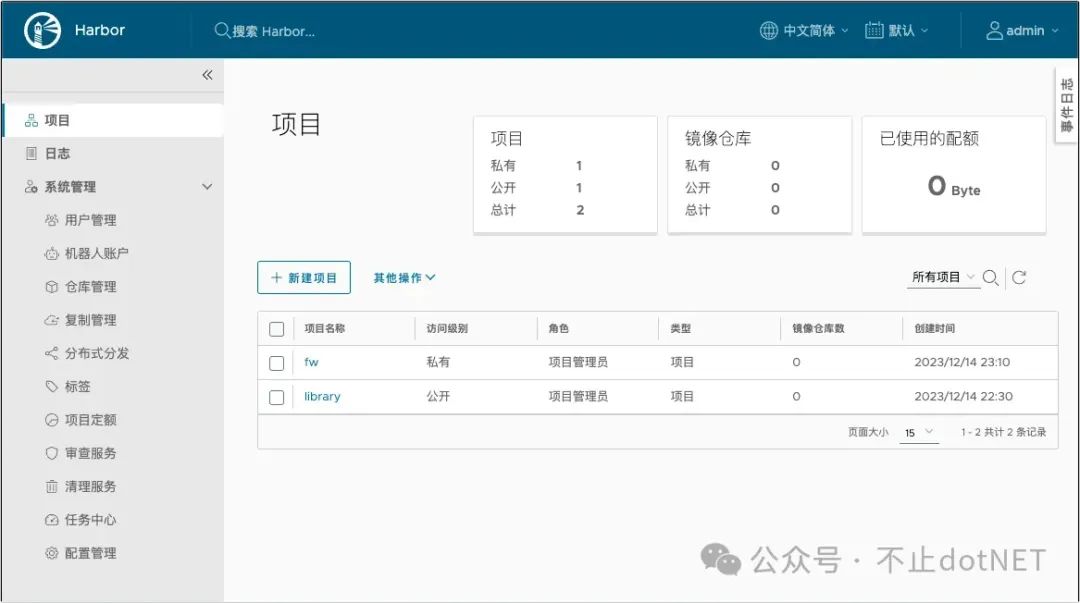
登錄后界面如下:
問題
1、內(nèi)網(wǎng)不能登錄
安裝完成后,在外網(wǎng)使用 docker login 發(fā)現(xiàn)不能正常登錄,于是先進內(nèi)網(wǎng)進行驗證,發(fā)現(xiàn)內(nèi)網(wǎng)也不能登陸,提示信息如下:
[root@localhost data]# docker login 172.16.10.103:9998 Username: admin Password: Error response from daemon: Get "https://172.16.10.103:9998/v2/": http: server gave HTTP response to HTTPS client
需要將內(nèi)網(wǎng)服務(wù)器 IP 和端口配置到 daemon.json 文件中,執(zhí)行下面命令進行配置:
sudo tee /etc/docker/daemon.json <<-'EOF'
> {
> "insecure-registries":["172.16.10.103:9998"]
> }
> EOF
然后執(zhí)行下面命令重啟生效:
sudo systemctl daemon-reload
sudo systemctl restart docker
再次登錄:
[root@localhost docker]# docker login 172.16.10.103:9998 Username: admin Password: WARNING! Your password will be stored unencrypted in /root/.docker/config.json. Configure a credential helper to remove this warning. See https://docs.docker.com/engine/reference/commandline/login/#credentials-store
Login Succeeded
這個不僅僅是內(nèi)網(wǎng),哪臺機器需要進行登錄操作,都需要進行上面的配置。
2、外網(wǎng)不能登錄
當內(nèi)網(wǎng)正常后,發(fā)現(xiàn)外網(wǎng)依然不能正常登錄,提示如下:
fengwei@fengweideMBP ~ % docker login hub.fwhyy.com:1234
Username: admin Password: Error response from daemon: Get "http://hub.fwhyy.com:1234/v2/": Get "http://172.16.10.103:9998/service/token?account=admin&client_id=docker&offline_token=true&service=harbor-registry": context deadline exceeded (Client.Timeout exceeded while awaiting headers) (Client.Timeout exceeded while awaiting headers)
解決這個問題需要修改 harbor.yml 配置,將 hostname 修改為外網(wǎng)的 IP 或域名(不需要加端口):
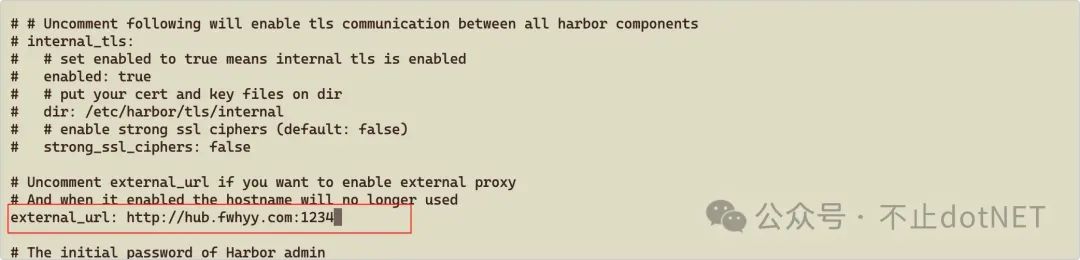
將 external_url 修改為外網(wǎng)訪問的地址(需要加上端口):
修改完后需要重啟 Harbor,執(zhí)行下面命令進行重啟:
cd /opt/harbor
./prepare
docker-compose down -v
docker-compose up -d
外網(wǎng)服務(wù)器的 nginx 配置如下:
server {
    listen       1234;
    server_name  hub.fwhyy.com;
    client_max_body_size 2000M;
    gzip  on;

   location / {
      proxy_pass http://172.16.10.103:9998;
      proxy_set_header Upgrade $http_upgrade;
      proxy_set_header Connection "upgrate";


      proxy_set_header X-Real-IP $remote_addr;
      proxy_set_header X-Forwarded-For $proxy_add_x_forwarded_for;
      proxy_set_header referer $http_referer;
      proxy_set_header X-Forwarded-Proto $scheme;
   }

     location /v2/ {
      proxy_pass http://172.16.10.103:9998/v2/;
      proxy_set_header Upgrade $http_upgrade;
      proxy_set_header Connection "upgrate";

      proxy_set_header X-Real-IP $remote_addr;
      proxy_set_header X-Forwarded-For $proxy_add_x_forwarded_for;
      proxy_set_header referer $http_referer;
      proxy_set_header X-Forwarded-Proto $scheme;
   }

     location /service/ {
      proxy_pass http://172.16.10.103:9998/service/;
      proxy_set_header Upgrade $http_upgrade;
      proxy_set_header Connection "upgrate";

      proxy_set_header X-Real-IP $remote_addr;
      proxy_set_header X-Forwarded-For $proxy_add_x_forwarded_for;
      proxy_set_header referer $http_referer;
      proxy_set_header X-Forwarded-Proto $scheme;
   }


   error_page   500 502 503 504  /50x.html;
    location = /50x.html {
        root   /usr/share/nginx/html;
    }
}
使用
Harbor 里功能比較多,常用的有項目、用戶管理、項目定額。
- 項目:可以針對不同的項目單獨創(chuàng)建,每個項目都有自己的鏡像地址
- 用戶管理:可以維護用戶,不同的項目可以設(shè)置不同的維護人員
- 項目定額:設(shè)置項目對應(yīng)的鏡像倉庫最大空間容量
下面就按照步驟將一個鏡像推送到 Harbor 中。
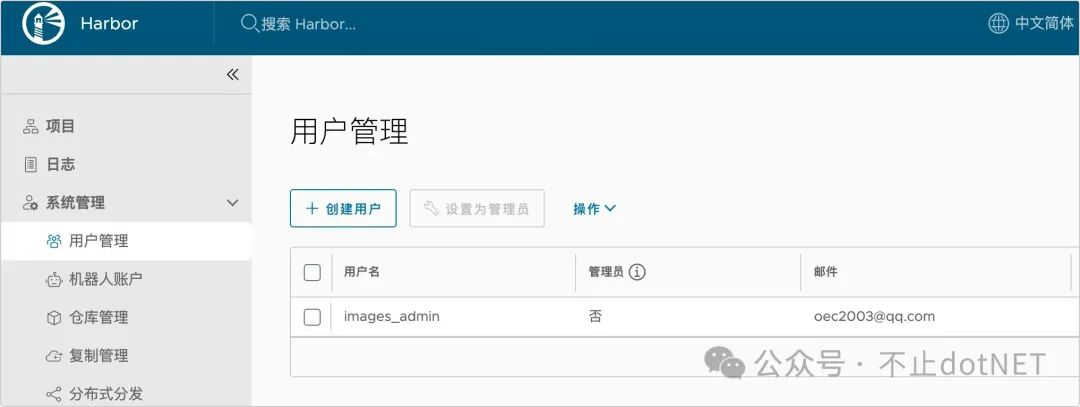
在用戶管理中創(chuàng)建名稱為 images_admin 的用戶:
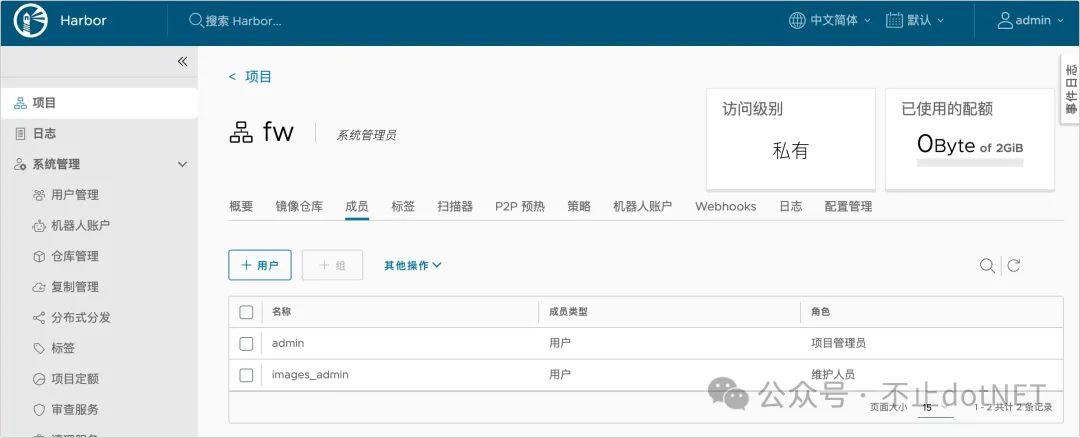
在項目中創(chuàng)建名稱為 fw 的項目,并添加 images_admin 為項目的維護人員:
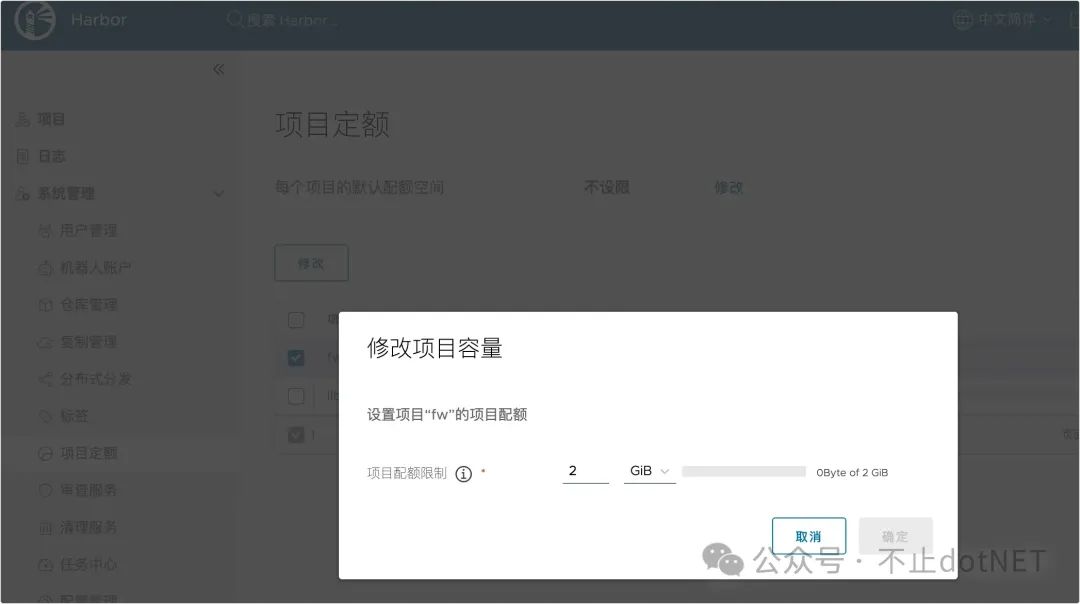
在項目定額中設(shè)置項目的配額大小為 2GB:
先以一個 nginx 鏡像為例,直接推送試試,命令如下:
docker tag nginx:latest hub.fwhyy.com:1234/fw/nginx:latest
docker push hub.fwhyy.com:1234/fw/nginx:latest
因為沒有登錄,會提示沒有權(quán)限推送:
The push refers to repository [hub.fwhyy.com:1234/fw/nginx] b074db3b55e1: Preparing e50c68532c4a: Preparing f6ba584ca3ec: Preparing 01aaa195cdad: Preparing 2a13e6a7cca6: Preparing 370869eba6e9: Waiting 7292cf786aa8: Waiting unauthorized: unauthorized to access repository: fw/nginx, action: push: unauthorized to access repository: fw/nginx, action: push
使用下面命令進行登錄后再進行推送:
docker login hub.fwhyy.com:1234
# 輸入用戶名密碼
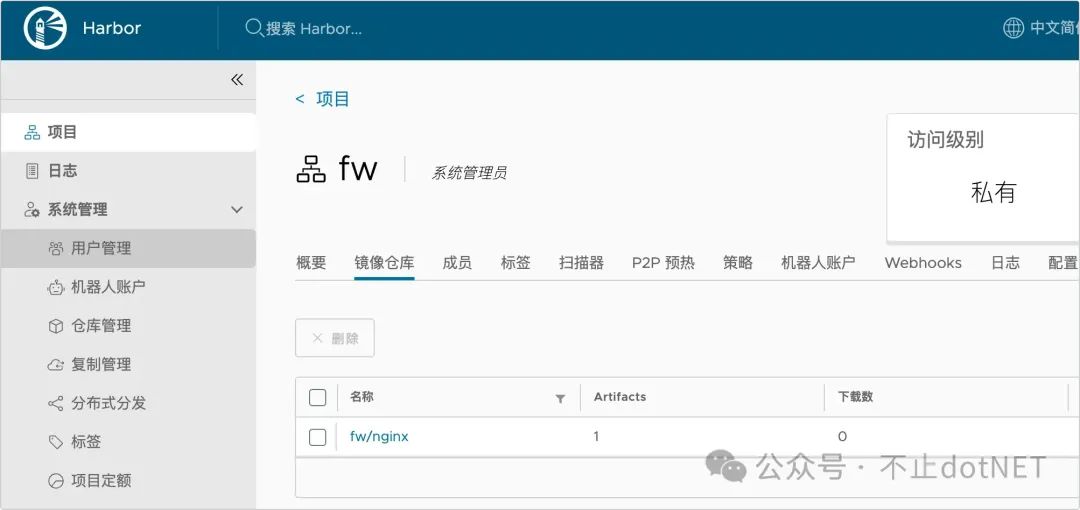
docker tag nginx:latest hub.fwhyy.com:1234/fw/nginx:latest
docker push hub.fwhyy.com:1234/fw/nginx:latest登錄后,就可以正常推送了,登錄進入系統(tǒng),可以看到在項目的鏡像倉庫中已經(jīng)可以看到了: