iOS開發(fā)ASIHTTPRequest使用代理連接
ASIHTTPRequest檢測系統(tǒng)的proxy設(shè)置并自動將proxy用于request。從1.0.6版本開始,它還支持PAC文件和要求授權(quán)的proxy。
默認情況下,ASIHTTPRequest將嘗試自動檢測proxy設(shè)置。當然,你可以看自己手動設(shè)置:
- // 手動設(shè)置代理服務(wù)器
- NSURL *url = [NSURL URLWithString:@"http://www.dreamingwish.com"];
- ASIHTTPRequest *request = [ASIHTTPRequest requestWithURL:url];
- [request setProxyHost:@"192.168.0.1"];
- [request setProxyPort:3128];
- // 另一種方法, 使用代理配置腳本文件
- // (***使用本地pac文件)
- [request setPACurl:[NSURL URLWithString:@"path/to/test.pac"]];
要求授權(quán)的proxy
在Mac OS上,ASIHTTPRequest可以自動檢測到要求授權(quán)的proxy的憑據(jù)(前提是在系統(tǒng)設(shè)定中設(shè)置好)。在iOS上,ASIHTTPRequest則無法自動檢測出授權(quán)憑據(jù),所以你要么手動使用delegate來向你的controller或者用戶索取合適的憑據(jù),要么讓ASIAuthenticationDialog向用戶索取憑據(jù)。一旦獲得了一個有效的proxy憑據(jù),那么該憑據(jù)將被存儲到keychian中(前提是啟用useKeychainPersistence )并自動重用。
手動為proxy指定憑據(jù)
- NSURL *url = [NSURL URLWithString:@"http://www.dreamingwish.com"];
- ASIHTTPRequest *request = [ASIHTTPRequest requestWithURL:url];
- [request setProxyHost:@"192.168.0.1"];
- [request setProxyPort:3128];
- //為要求授權(quán)的proxy設(shè)置username 和password
- [request setProxyUsername:@"bencopsey"];
- [request setProxyPassword:@"password"];
- // 對于NTLM proxy,還要設(shè)置 domain (NTLM proxy功能是未經(jīng)測試的)
- [request setProxyDomain:@"la.la.land"];
使用delegate來提供proxy憑據(jù)
這個特性的工作原理和“使用delegate提供HTTP授權(quán)”一樣,只有一點不同:你的delegate要響應(yīng)proxyAuthenticationNeededForRequest:函數(shù)。
使用內(nèi)建的授權(quán)對話框(僅適用于iOS)
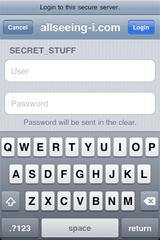
這個特性歸功于1.0.8版本的新類ASIAuthenticationDialog 。用來向用戶索取憑據(jù)來授權(quán)webserver或者proxy。
如果你的delegate不響應(yīng)proxyAuthenticationNeededForRequest:函數(shù),那么默認情況下,ASIHTTPRequest將會顯示一個對客戶來提示用戶輸入授權(quán)憑據(jù)。使用ASIHTTPRequest,開發(fā)者不再需要寫額外的代碼來顯示授權(quán)對話框,因為默認情況下,ASIHTTPRequest就會顯示它。
使用同步request時proxy授權(quán)對話框不會顯示出來。
如果你不限使用proxy授權(quán)對話框,那么你要么實現(xiàn)proxyAuthenticationNeededForRequest:,要么設(shè)置shouldPresentProxyAuthenticationDialog 為false(此時你的程序?qū)o法連接到proxy)。如果你要改變對話框的樣式,你得繼承ASIHTTPRequest類,重寫showProxyAuthenticationDialog 來顯示你自己的對話框或者ASIAuthenticationDialog 子類.


